Kodi has been a game-changer for me when it comes to streaming movies, TV shows, and live content. It’s an open-source platform that offers incredible flexibility, but the real magic lies in the add-ons. One of my favorites is The Crew, a versatile and reliable add-on that offers a massive library of content. Installing it wasn’t as straightforward as downloading an app from the Play Store, but with a bit of guidance, you’ll have it up and running in no time. Let me take you through the step-by-step process of installing The Crew repository and plugin on Kodi.
Why I Chose The Crew
Before we dive into the installation, let me tell you why I decided to go with The Crew. I’d tried other Kodi add-ons in the past, but many of them had issues like broken links or limited content. The Crew stood out because it’s frequently updated, has a wide variety of categories, and provides consistent performance. Whether I’m in the mood for a classic movie, the latest TV series, or even live sports, The Crew has me covered.
Preparing Kodi for Third-Party Add-Ons
The first thing you need to do before installing any third-party add-on like The Crew is to adjust Kodi’s settings. By default, Kodi blocks third-party installations to protect users from malicious software. Here’s how to enable it:
- Launch Kodi and go to the home screen.
- Click on the gear icon (Settings) at the top left.
- Navigate to System Settings and then click on Add-ons in the left sidebar.
- Enable the toggle for Unknown Sources. A warning will appear, but don’t worry—as long as you stick to trusted repositories like The Crew, you’re safe.
Installing The Crew Repository
Now that Kodi is ready to accept third-party add-ons, it’s time to install The Crew repository. Here’s the step-by-step process:
- Open Kodi and go back to the home screen.
- Click on the gear icon (Settings) again.
- Navigate to File Manager and then double-click on Add Source in the left or right pane.
- A pop-up window will appear. Click on and type in the following URL exactly as shown:
https://team-crew.github.io/. This is the official source for The Crew repository. - Give the source a name—I usually name it “The Crew” for easy identification—and click OK.
Installing The Crew Add-On
Once the repository is added, you can proceed to install The Crew add-on. Here’s how:
- Return to Kodi’s home screen and click on Add-ons in the left sidebar.
- Click on the open box icon (Package Installer) at the top left.
- Select Install from zip file and click on the source you named earlier (e.g., “The Crew”).
- Choose the zip file named
repository.thecrew-*.zipand wait for a notification that the repository has been installed. - Now, select Install from repository, then click on The Crew Repo.
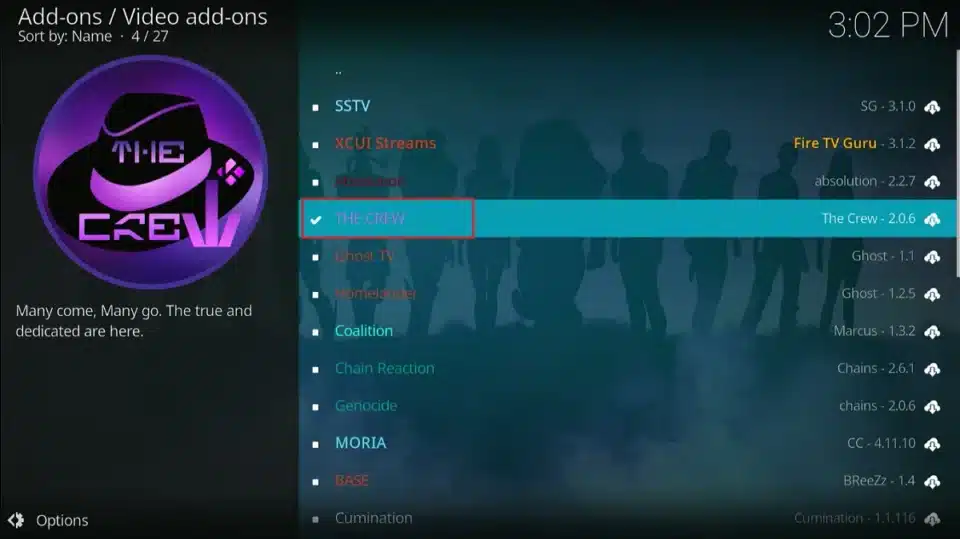
- Navigate to Video add-ons and select The Crew.
- Click Install and wait for the add-on to be installed. You’ll see a notification once it’s done.
Configuring The Crew
Once installed, you can customize The Crew to your liking:
- Open The Crew from the Add-ons menu on Kodi’s home screen.
- Navigate through the categories to explore movies, TV shows, live TV, sports, and more.
- If you have a Real-Debrid account (a premium service for high-quality links), you can integrate it with The Crew for an even better streaming experience. Simply go to Settings in The Crew, select ResolveURL Settings, and follow the prompts to authorize Real-Debrid.
Troubleshooting Tips
If you encounter issues while installing or using The Crew, here are some quick fixes:
- No Stream Available: Make sure The Crew is updated. You can do this by going to Add-ons > My Add-ons > The Crew > Update.
- Failed to Install Dependency: Ensure that the repository URL was entered correctly and that your internet connection is stable.
- Buffering Issues: Adjust the playback settings in The Crew or integrate Real-Debrid for better links.
The Importance of Using a VPN
When I first started using Kodi, I didn’t think much about online privacy. But after hearing horror stories about ISPs throttling speeds or users receiving copyright infringement notices, I realized the importance of using a VPN. A Virtual Private Network (VPN) encrypts your internet traffic, masking your online activities and protecting your identity.
For Kodi users, a VPN is essential, especially if you’re accessing content through third-party add-ons. After trying several VPN services, I settled on Bitdefender VPN. Here’s why:
- Top-Notch Security: Bitdefender VPN uses military-grade encryption to keep your data safe.
- Fast Speeds: Streaming requires a fast and stable connection, and Bitdefender delivers.
- Ease of Use: The interface is straightforward, making it easy to connect to a server with just a few clicks.
If you value your privacy as much as I do, I highly recommend signing up for Bitdefender VPN (check out my review here). Not only will it protect your streaming activities, but it’ll also ensure a smoother experience by bypassing ISP throttling. Click here to sign up and take the first step toward secure streaming.
Final Thoughts
Installing The Crew on Kodi has transformed my streaming experience. It’s like having a one-stop shop for all my entertainment needs. The process might seem a bit daunting at first, but once you’ve done it, you’ll wonder why you didn’t try it sooner. Just remember to always use a VPN like Bitdefender to keep your online activities private and secure. Happy streaming!


