 You’re out and about with your laptop and in desperate need of an internet connection but there isn’t a Starbucks for miles! You need to send that email your boss wants, so what options do you have in such an emergency?
Well luckily for you, your Android powered smartphone comes to the rescue. Most modern android devices (smartphone and tablets) have an option called tethering (although some carriers block this option in branded devices) which allows you to share your phones mobile data connection with other devices like you laptop – a bit like one of those mobile broadband dongles using USB, Bluetooth or Wi-Fi.
In this example I’ll show you how to setup a mobile Wi-Fi hotspot using a Nexus S.
Turning On Wireless Tethering
This may vary slightly from phone to phone, but you should get the gist of what’s involved.
- At the phones home screen, tap Options Menu > System Settings and under the Wireless & Networks heading tap More… > Tethering & portable hotspot and tap the Portable Wi-Fi hotspot button to activate it. A little tethering icon will appear in the menu bar letting you know it’s active.
- Just like a wireless router at home or in the office, it makes sense to protect your portable Wi-Fi hotspot with a password so know on else can access it. So under the Portable Wi-Fi hotspot button, tap the Setup Wi-Fi hotspot, name the hotspot, mine call “AndroidAP”, and add give it a password.
 That’s the portable Wi-Fi hotspot setup on the phone so let’s configure a laptop to use it.
Connecting Your Laptop
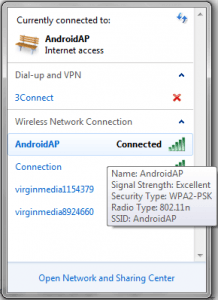
Connecting a laptop to your phones wireless hotspot is no different than connecting to your home router. Click on the wireless icon at the bottom right of your laptops screen. This will bring up a list of available connections within range.
As you can see from the picture, my mobile phones Wi-Fi hotspot has appeared called “AndroidAP”. Double click on this and enter the password you created before. If all has gone to plan, you should now be connected to the internet via your phone.


