Years ago, I had a computer that I thought was on its last legs. It was slow, unresponsive, and constantly freezing. I had tried everything I knew—deleting unnecessary files, upgrading the RAM, even reinstalling Windows. But nothing seemed to breathe new life into my aging machine. Frustrated and on the verge of buying a new computer, I stumbled upon an article about disk defragmentation.
At the time, I didn’t fully understand what defragging a hard drive meant. All I knew was that it was supposed to make my computer run faster. Curious and with nothing to lose, I decided to give it a try. Little did I know, this simple action would completely change my perspective on maintaining my computer’s performance.
What Does Defragging Do?
Before diving into my experience with Smart Defrag, it’s important to understand what disk fragmentation is. Think of your hard drive as a giant library. When you save a file, it’s like placing a book on a shelf. Over time, as you add, delete, and move files, the data gets scattered across the library. Instead of being neatly organized, the pieces of each file end up in different locations, making it harder for your computer to retrieve them. This is disk fragmentation.
When your files are fragmented, your computer has to work harder to find and piece together all the fragments. This slows down your system, leading to longer load times, sluggish performance, and in some cases, system crashes.
My First Encounter with Defragging Software
Back in the day, Windows had a built-in defragmentation tool. It was basic, slow, and didn’t offer much in terms of user control. I remember starting the defragmentation process in the evening and waking up the next morning to find it still running. While it did improve my computer’s performance slightly, it was far from the miracle I was hoping for.
That’s when I began looking for alternatives and came across Smart Defrag by IObit. The software promised faster defragmentation times and deeper optimization. Skeptical but intrigued, I decided to give it a shot.
Why I Chose Smart Defrag
What drew me to Smart Defrag was its promise of an advanced, intelligent defragmentation process. Unlike the default Windows tool, Smart Defrag not only defragments your hard drive but also optimizes file placement for faster access. This means that frequently used files are placed in areas of the disk where they can be accessed quickly, further improving your system’s performance.
Another appealing feature was the “Boot Time Defrag,” which allows the program to defragment files that are normally locked by the system during regular operation. These include system files, page files, and the Master File Table (MFT). By defragging these critical files, Smart Defrag can significantly improve your computer’s boot time and overall responsiveness.
Setting Up Smart Defrag: A Simple Start to a Smarter PC
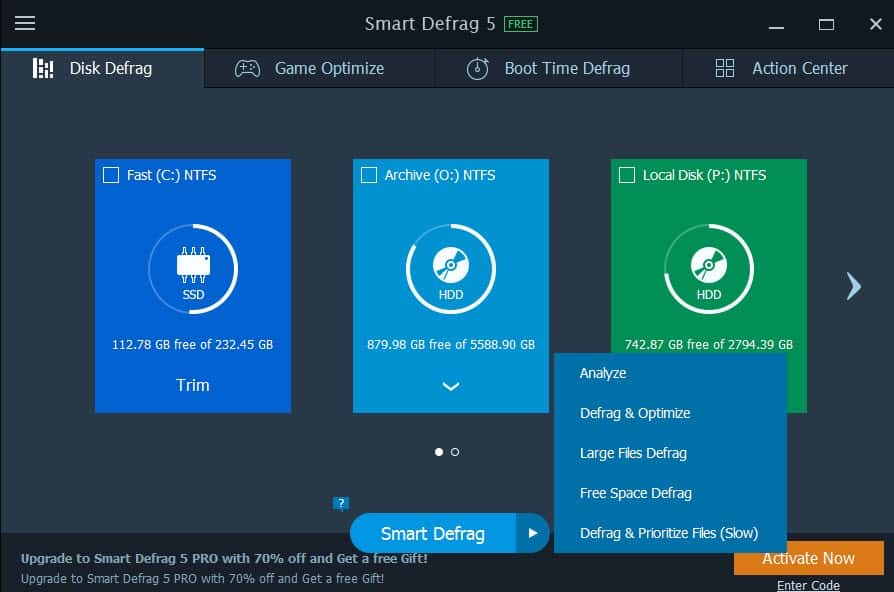
The installation process for Smart Defrag was straightforward. After downloading and installing the software, I was greeted with a user-friendly interface that made it easy to get started. The program offered several defragmentation options, including a basic defrag, defrag and optimize, and boot time defrag.
For my first run, I chose the “Defrag and Fully Optimize” option, which not only defragments the disk but also arranges files in a way that speeds up access times. I started the process and went about my day, expecting it to take hours based on my previous experience with the Windows defragmenter.
To my surprise, Smart Defrag finished the process in a fraction of the time. When I returned to my computer, it was as if it had been given a new lease on life. Programs that once took minutes to load now opened in seconds, and the system felt more responsive overall.
The Difference Was Night and Day
The transformation was remarkable. My computer, which I had considered replacing, now felt almost as fast as when I first bought it. Applications that had previously taken forever to load now launched almost instantaneously. Even startup time was significantly reduced. I was amazed at how much of a difference a simple defrag could make, and I regretted not discovering this sooner.
One of the most noticeable improvements was in gaming. I’m an avid gamer, and nothing is more frustrating than lag and slow load times. After using Smart Defrag, my games ran smoother, and load times were drastically reduced. It was like upgrading my hardware without spending a dime.
Maintaining Peak Performance with Smart Defrag
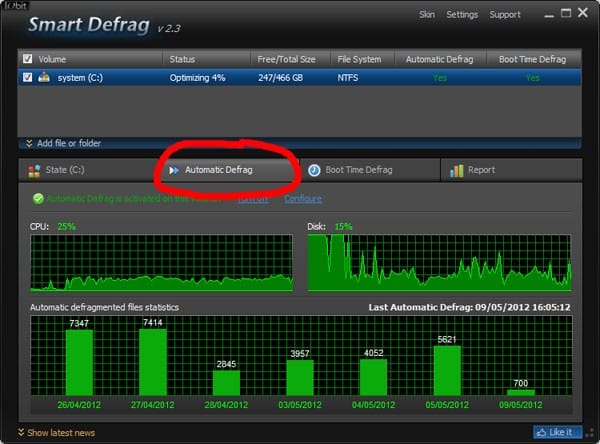
One of the best features of Smart Defrag is its ability to run automatically in the background. It monitors your disk usage and defragments your hard drive when your computer is idle, ensuring that your system stays optimized without any additional effort on your part. This feature is particularly useful for people like me who often forget to perform regular maintenance tasks.

The software also allows you to schedule defragmentation tasks. You can set it to run daily, weekly, or monthly, depending on your needs. I opted for a weekly defrag, which kept my computer running smoothly without me having to think about it.
The Long-Term Benefits: Prolonging the Life of My Hard Drive
Over the years, I’ve continued to use Smart Defrag regularly, and it has consistently kept my computer in top shape. I’ve noticed that not only does it improve performance, but it also helps prolong the life of my hard drive. By reducing fragmentation, the hard drive doesn’t have to work as hard to retrieve files, which reduces wear and tear.
This is especially important for traditional hard drives, which have moving parts that can wear out over time. Even though I eventually upgraded to a solid-state drive (SSD), I still use Smart Defrag to optimize my storage. While SSDs don’t suffer from fragmentation in the same way as traditional hard drives, they can still benefit from file optimization, which Smart Defrag handles beautifully.
The Evolution of Smart Defrag: Continuous Improvement
Over the years, I’ve seen Smart Defrag evolve with new features and improvements. The developers at IObit have consistently updated the software to keep up with the latest technology and user needs. Each new version brings enhancements in speed, efficiency, and user experience.
One of the more recent features I’ve found particularly useful is the ability to customize defrag strategies for different types of files. For example, you can choose to prioritize large files or frequently used files, depending on your needs. This level of customization allows for even greater optimization, tailored specifically to how you use your computer.
The Broader Impact: Spreading the Word
My positive experience with Smart Defrag led me to recommend it to friends and family. I’ve helped several people install and set up the software on their computers, and the feedback has been overwhelmingly positive. For many, it was a game-changer, turning their sluggish machines into faster, more efficient systems.
One of my friends, who was about to replace his computer due to slow performance, was amazed at the difference Smart Defrag made. After running a full defrag and optimization, his computer was noticeably faster, and he decided to hold off on buying a new one. It was a great feeling to help someone save money and get more life out of their existing hardware.
Why I Trust Smart Defrag: Reliability and Peace of Mind
In a world where software often overpromises and underdelivers, Smart Defrag has consistently proven its value. It’s a tool that I’ve come to rely on for maintaining my computer’s performance, and it has never let me down. The software is well-designed, regularly updated, and backed by a reputable company with a track record of producing high-quality PC optimization tools.
The peace of mind that comes from knowing my computer is running at its best is invaluable. I no longer worry about slowdowns, crashes, or long load times. Smart Defrag has become an essential part of my PC maintenance routine, and I can’t imagine going back to the days before I discovered it.
A Final Word: Don’t Underestimate the Power of Defragmentation
If you’re struggling with a slow computer, don’t underestimate the impact that disk fragmentation can have on your system’s performance. While it might seem like a minor issue, the reality is that fragmentation can significantly degrade your computer’s speed and responsiveness over time.
Smart Defrag offers an easy and effective solution to this problem. It’s user-friendly, powerful, and—best of all—free. Whether you’re a casual user or a power user, this tool can help you get the most out of your hard drive, prolong its life, and keep your computer running smoothly.
My Recommendation: Give Smart Defrag a Try
Based on my personal experience, I highly recommend giving Smart Defrag a try. It’s a simple yet powerful tool that can make a world of difference in your computer’s performance. Whether you’re dealing with a sluggish machine or just want to ensure your system is running at its best, Smart Defrag is a must-have in your PC optimization toolkit.
Remember, regular maintenance is key to keeping your computer in top shape. With Smart Defrag, maintaining your hard drive’s health is as easy as clicking a button. Don’t wait until your computer grinds to a halt—start defragging today and experience the difference for yourself.


“It can defrag you PC boot time for faster system boots” – Sure that’s what you mean…?
Good spot David. Got my wires crossed there thinking of Bootvis instead and have now corrected the mistake.
Cheers
Mike