![]() Today I will show you how to make a bootable USB pen drive with your choice of Linux installation image on it. This will work with both standard install images as well as with the live versions.
Today I will show you how to make a bootable USB pen drive with your choice of Linux installation image on it. This will work with both standard install images as well as with the live versions.
Making a bootable pen drive has many advantages over a CD or DVD such as increased reliability, vastly increased speed and from a physical perspective, is much easier to carry around.
Download a Linux Distro
The first thing you are going to need is the distribution (distro) of Linux you want to use. There are several different versions to choose from such a Dabian, Fedora and openSUSE to name but a few.
For this example, I am going to use my distro of choice, Ubuntu (which is a derivative of Dabian). You can download Ubuntu here. I like Ubuntu as it is a live variant of Linux so it lets you boot straight from the USB and try it before you commit and installing it on your hard drive.
Ubuntu is also easy to use if you’re familiar with Windows, you’ll find its GUI is easy to navigate; especially if it’s your first dabble in the world of Linux.
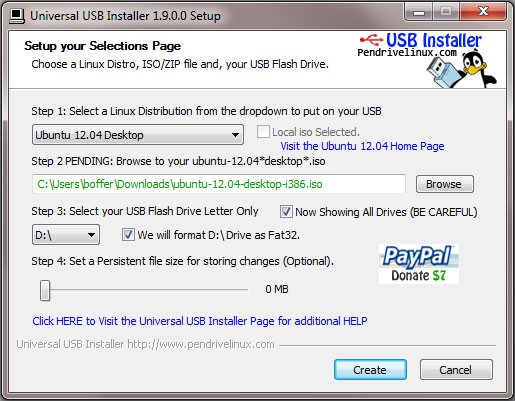
Using Universal USB Installer
Now that you have downloaded your distro of choice, you need a program called Universal USB Installer by www.pendrivelinux.com – Download it here. This will essentially format your pen drive making the partition active allowing you to boot from it.
Insert the pen drive you want to use into a free USB port in your computers. Navigate to “My Computer” and check its drive letter. For example, my pen drive is drive D:

Extracting Linux To Your Pen Drive
- Start Universal USB Installer and select the version of Linux that you have just downloaded from the drop down menu.
- Now click on the browse button and navigate to where ever you saved the .iso file.
- Now for me, step 3 in Universal USB Installer wouldn’t let me choose my pen drive unless I checked the “Show all drives” tick box so you may have to do the same. Here you will need to check and double check you select the correct drive. If you select the wrong drive, you could end up wiping you entire computer and that would not be good! I also ticked the format option and left the persistent file size at the default setting.
- Now click Create. You will be given one last chance to double check you have the correct drive so check and click yes.
Universal USB Installer will now format and activate the partition on your pen drive and start to copy the files over.Once the process has finished, you’ll have a bootable Linux pen drive so why not restart you PC, select to boot from USB and have a play!


Well explained but grub4dos is better than this one.
I have windows 7, xp, ubuntu in my usb pendrive using grub4dos.
Hi Ahmed,
I’ll have to look into grub4dos. It sounds really useful being able to have multiple
OS installers on one pen drive…
yes grub4dos is great, you can also use a gui based app to do this easy.
I personally used a grub4dos gui app named Winsetupfromusb.
you can grab it from below url:
http://www.softpedia.com/get/PORTABLE-SOFTWARE/System/System-Enhancements/WinSetupFromUSB.shtml
Very good tutorial, this tutorial is very useful where I can use my flashdisk for linux bootable.